Tutorial – Eclipse Marketplace & Favourites List

A few months ago we introduced the Eclipse Marketplace Favourites List. To explain how it works I created a video tutorial. This article will be a more classic tutorial to explain what Eclipse Marketplace is and how you can use the Favourite Lists to your advantage.

What is Eclipse Marketplace?

The Eclipse Marketplace is a place to discover, share, and install relevant Eclipse plugins and solutions. Think of it like an app store for Eclipse solutions.

One of it’s main uses is to add plugins to your Eclipse installation. You will also find applications based on Eclipse Platform, tooling for IoT and other solutions and services. In this article you’ll find out how to do so – you might even learn a few new tricks along the way.

Favourite list online

One of the great features of the Eclipse Marketplace is the possibility to create and share a list of plugins. This is very helpful if you have many Eclipse installations, and want to find and install your favourites one quickly. How can you do this on the Eclipse website?

How to do this on the website?

  1. Go to https://marketplace.eclipse.org/ and sign up. Or create an account if you don’t have one yet.
  2. Search for your favourite solution
  3. Click on the white star below the logo to add a plugin to your Favourites list.
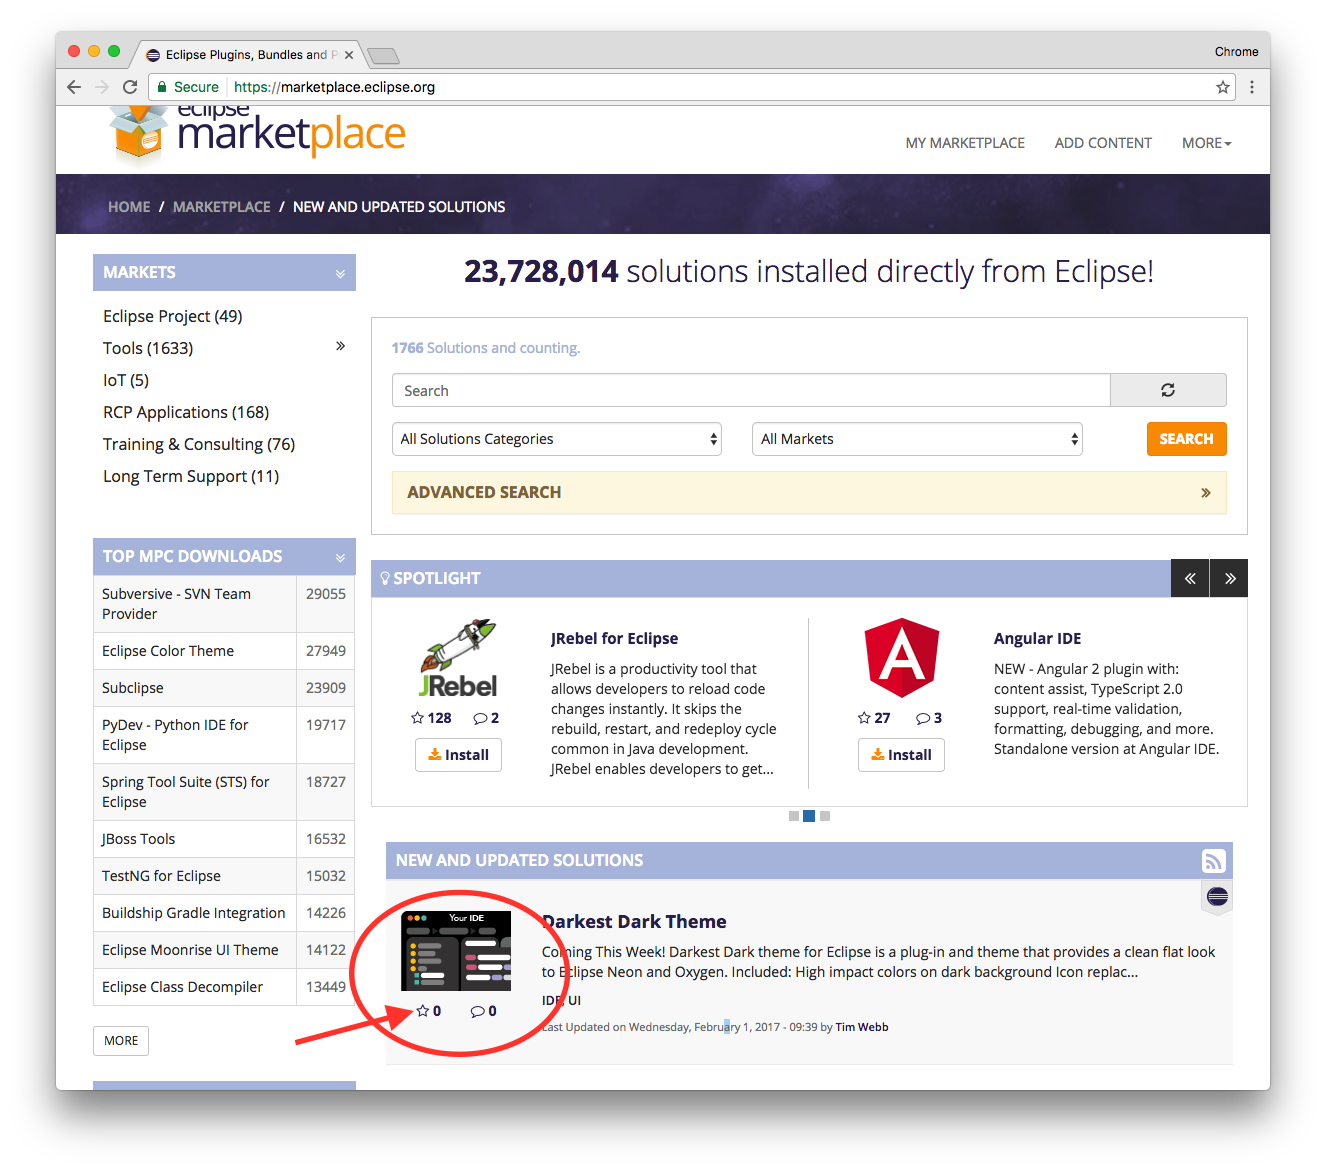
Visual Example

In this example, Darkest Dark Theme will be added to my favourites plugins list. Once a plugin has been “starred” it is automatically added to your list.

To view it, simply go to “My Marketplace”:

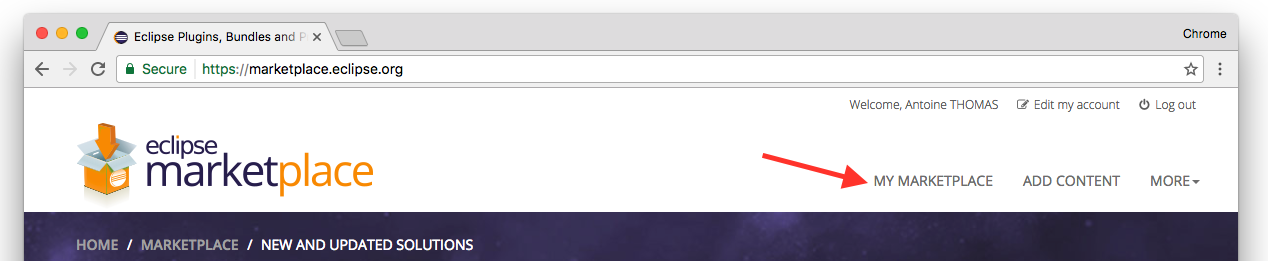
And there it is, in your list of favorites!

Marketplace Client in Eclipse

Manage plugins

Did you know? You can install plugins from your Eclipse IDEs using the Marketplace Client. To launch it:

  1. Click on the “Help” tab in the menu.
  2. Click on “Eclipse Marketplace”.

You can also launch it using the Quick Access Bar at the top right of your Eclipse workspace.

  1. Click “Alt + 3” (Windows) or “Command + 3” (Mac) to launch the Quick Access search bar
  2. Type “Eclipse Marketplace”
  3. Hit “Enter” and voila – you’re there!

You can display and manage your favorites here too:

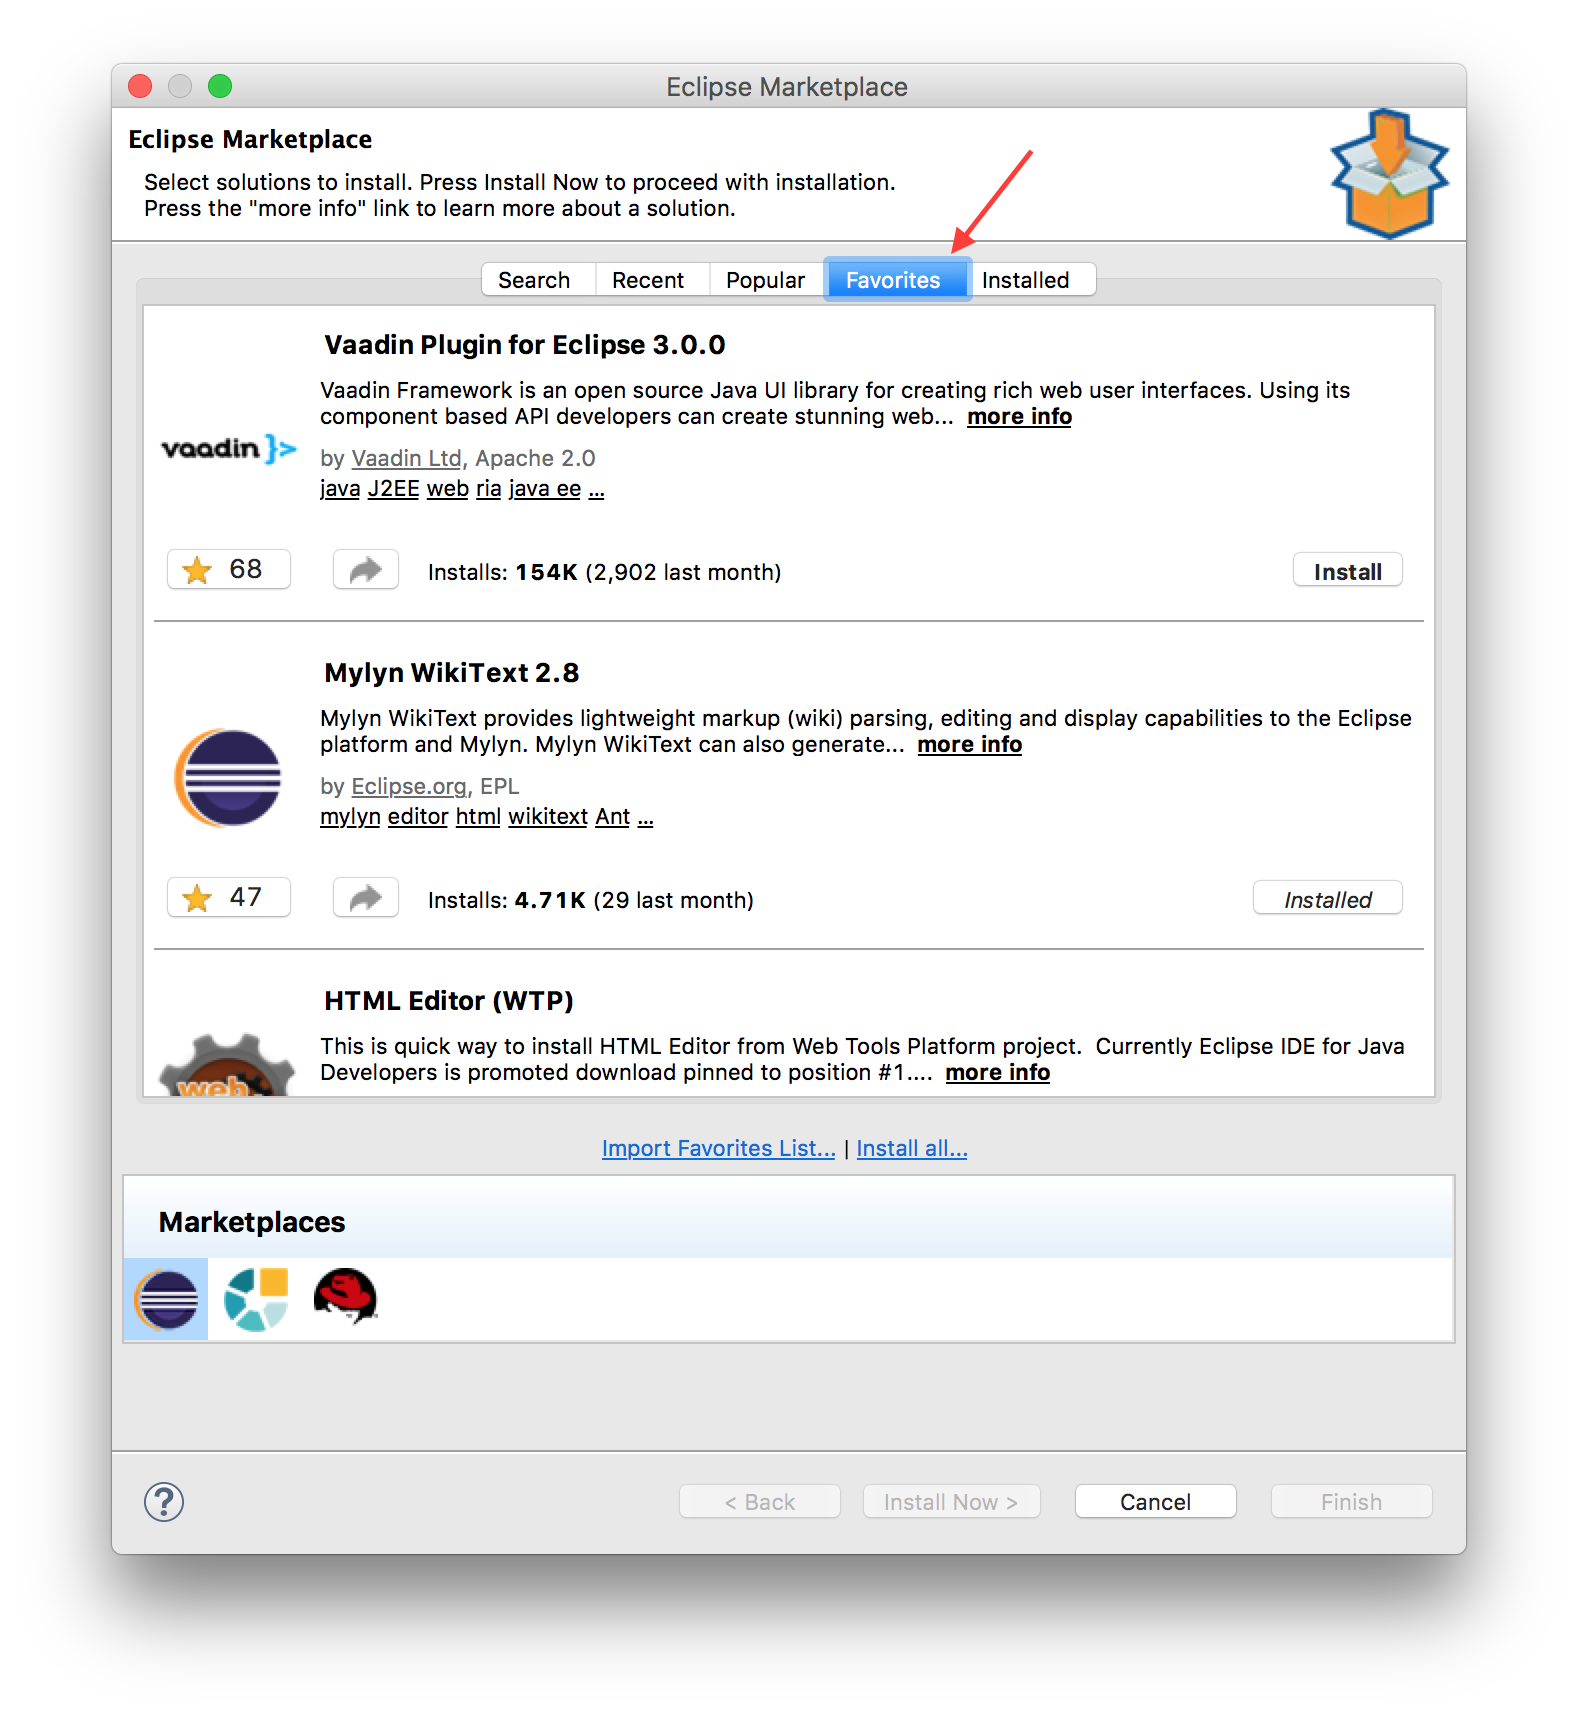
You can off course add, remove, and install plugins. The Eclipse Marketplace Client and the website store your favorites with your eclipse.org account, so they are synchronised.

Copying Another User’s Favourite List

If you want to install plugins in the list of someone else, say, a colleague, or another contributor to a project, this is also possible.  You can import a favourites list from an other Community users, and then select the plugin you want.

It’s also possible to install plugins from someone else’s list , say, a colleague, or another project contributor. To import a favourites list from an other Community users in your workspace Marketplace client:

  1. Click on “Import Favourites List”
  2. Copy/paste the link to someone’s favorites lists.
  3. All plugins are automatically selected. Unselect any plugins you don’t want by unchecking the checkboxes to the left of each individual plugin.
  4. Click import.

Here is an example with Lars Vogel‘s plugins.

Share

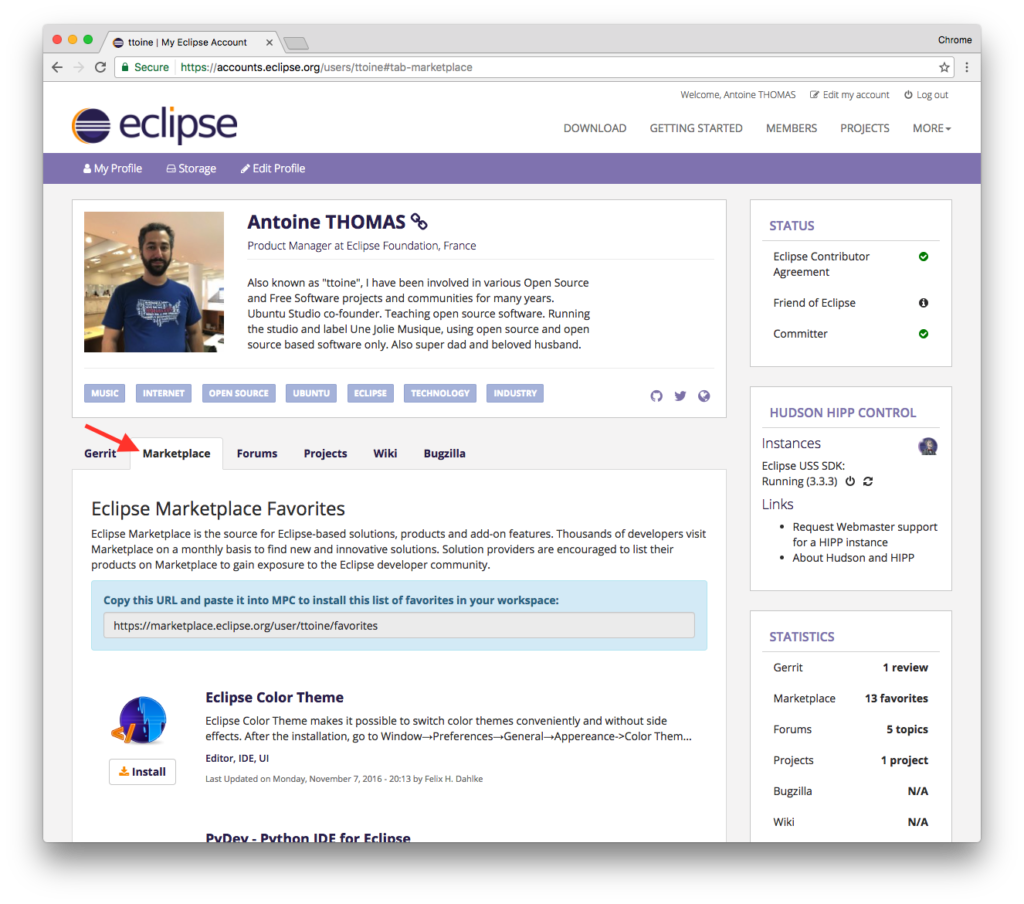
Long story short, to save time or to share your favourite plugins quickly and easily with someone else, you can add plugins to your favourites list. Sharing is simple, all you need is the link to your list. You can find this link on your user profile:

Here are a few Favourites Lists that I would like to share with you. You can import them directly by copying and pasting the link in Eclipse Marketplace Client:

Do not hesitate to share your favourite list on social networks. You can use #EclipseMarketplace on Twitter.

Feedback welcome

As usual, feedback is welcome and discussion is open. Do not hesitate to comment this article or to open an bug.

Introduction to WireframeSketcher

WireframeSketcher is based on Eclipse platform. I use it a lot to create mockups for websites and applications. It helps to focus on content, usability and features, instead of design. When your mockup is tested with future end users and documented for developers, it’s time think about design.

Overview

Eclipse users will not be disappointed, the workbench is quite the same, but in the middle, you draw instead of writing code. Also, instead of just drawing basic shape, there is a style added so everything looks like it has been done on paper with a pen. This way, in the mind of people looking at the mockup, you are sure they think about it as a mockup, and not as a definitive design.

You can also add annotations for documentation purpose.

And you can create links on items to other screens, in order to create a live mockup. You can play the live mockup in Wireframesketcher, and also export in HTML to share it.

First project

Menu: File / New / Wireframe project

You can select different type of project, from web to smartphone app, …

Assets

You might want to build a mockup using elements you already have: logo, screenshots or pictures, icons, … You can add them to the “assets” folder of WireframeSketcher folder. They will be available on the right column. When possible add SVG files, so that the software can apply the “hand style”.

WireframeSketcher provides Stencils, it is libraries of screens, icons, mockups, ready to use. You can find them on their website:
http://wireframesketcher.com/mockups/index.html

Icons

You can add an icon alone or with a label, by adding the “Icon” element from the palette.

It is also possible to add icons in some content (text) or attached to an item (button, input, …). To attach an icon to an item, you can click on the properties on the left sidebar, and you can browse the different icon librairies available. With text, you can start to type the name of an icon in { } and use ctrl+space to display some help.

Links

Draw at least 2 screens. You can add links to another screen on elements like buttons, but also on text. Text must be between [ ] to be considered as link. You can’t add links to external resource.

In a screen, select the element. On the left sidebar, next to “Properties”, select “Links”. You will find a list of possible links, just click on the one you want and select the screen to open. That’s all. You will notice the link on the mockup with a special small yellow icon on the item.

The most difficult part of it is to think about the structure, all the links between all the pages. On a live demo, you can highlight links, so testers can easily find the clickable areas.

Annotations

On the right column you will find annotations elements. You can of course change the colour. If you need to use an other element (a square, a round, …), and make it an annotation, you can do that in the menu: Object / Mark as annotation.

During export, you can choose if you want to see them, or hide them.

Storyboard

A storyboard is what will allow you to run the mockup. Put in it all the screens. Be careful about the order of the screens, so the user starts the mockups at the good place. Once done, you can run or export your live mockup.

During a live demo, users will be able to click on the links, or to use left and right keyboard arrows.

Missing features

IMHO, there are two issues with the current version of Wireframesketcher:

  1. You can’t hide annotation while working on the screen, so if you have stuff below, you can not select them. It’s really bad for productivity. There should be at least a layer management system, so one can put all the annotations in one layer and hide them. This is really a missing feature. I already discussed about it on the user forum, the solution they propose is not really useful. And there is no workaround.
  2. There are a lot of text styling options, but no equivalent of the “pre” html tag. It means there is no way to add monotype text.  Let say you want to show how command line or code should look in a design, with fixed characters size, this is not possible. If you are interested too, do not hesitate to tell the developers on the forum.

Conclusion

Despite a few missing features, I really appreciate WireframeSketcher to work on features and UX. I use it at the moment mainly for web stuff. However, I really think that would be awesome to have Eclipse Platform stencils. This way, Eclipse developers could use that to work on their UI/UX before starting to code, collect end user feedback. And also, very important thing, this would be great to share best practice and have a more consistant UI across different Eclipse plugins, applications, tools, …